For many, the word “burpee” is synonymous with fear.
Not surprisingly, it is a demanding exercise that will require a lot of effort if you want to get the most out of it.
In this post, we are going to tell you all about this exercise so that you no longer have to fear it and can start doing it safely. The benefits are worth it. Let’s go!
What are burpees and how did they come about?
Although burpees have become very popular in recent years, especially at CrossFit, they are not new.
They owe their name to Royal H. Burpee, a physiologist at Columbia University (USA) in the 1930s who, during his thesis, developed this exercise.
He wanted to be able to assess a person's physical condition with a simple exercise without any equipment, all the while having the exercise be demanding and very intense.
The US Army then started to use it to test the endurance of its Army and Navy personnel in preparation for World War II.
Types of burpees
Here are the most common types of burpees. You can choose depending on which muscles you want to work and your physical condition.
Simple burpee.
The original, which Royal H. Burpee designed.
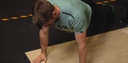
Start by doing a squat until your hands touch the floor, then straighten your legs back to a plank position and bring them back to the squat and stand up.
Easy? Now let’s see how things can get a bit more complicated...
Burpee without squat.
In this variation, we forget about the squat, going to the plank position with one jump and returning to the upright position with another jump.
With this version, you work less on your legs but increase your endurance and push your cardiovascular system to the limit.
From here, we add movements.
Burpee with vertical jump.
From the squat, you go to a plank position and once you return to the squat you do a vertical jump, as high as you can.
Burpee with lateral jump.
This time you will do a squat, move into a plank position, but quickly go into a side plank. You then change sides with each repetition.
Jack burpee.
For this variation, in the plank position you do a jumping plank (you open and close your legs with a jump).
Burpee with box jump.
For this variation, you will do one of the previous versions, but the final jump is to a box, step, bench, etc.
The higher you have to jump, the more intense the exercise.
These are just a few types of burpees. You can combine them with other exercises such as pull-ups, Hindu push-ups, jumping jacks, etc.
You can also adjust them to your capabilities. For example, if at the beginning you lack the strength to do the push-up, you can support your knees.
The most common mistakes when doing burpees
We don't want you to get injured, so we're going to share with you the most common mistakes and how to avoid them.
Not mastering the exercises separately first.
You'll have to do squats, planks, push-ups, lunges, etc., and you'll want to do them fast to get more reps in (or to get the suffering over with). If you don't master the exercises beforehand, you will end up neglecting your technique and risking injury.
If you don't quite get an exercise right (or don't know if you're doing it correctly), it's best to practice it beforehand with your coach.
Not warming up properly.
Many people use burpees as part of their warm-up.
Wrong!
This type of exercise is very demanding and requires prior preparation in order to be able to do it without hurting yourself.
Not staying focused.
We know you want to finish as quickly as possible and it's easy to let your mind wander, but it's important to stay focused on each movement so that you don't neglect your technique and can minimize the risk of injury.
Bending the back.
Make sure you keep your back straight when you are in the plank position.
Tighten the core (abs, lower back, etc.)
Not cushioning the fall.
Not jumping properly will have a big impact on your knees.
Remember to land on your toes first, bending your knees slightly.
Incorrect shoulder positioning.
Planks and push-ups are tricky.
Your shoulders should be level with your wrists, neither in front nor behind. This saves your shoulders and wrists unnecessary strain, reduces the risk of injury, and ensures you get the most out of the exercise.